facebook
flickr
linkedin
twitter
email
pinterest
  • HOME
  • ABOUT ME
  • SUBSCRIBE
  • BLOG
  • MY SHOPS
    • Etsy - Personal Use
    • Etsy - Commercial Use
    • Oscraps - Personal Use
    • Oscraps - Commercial Use
  • TOU
  • PRIVACY POLICY
  • WHAT PEOPLE SAY

August 2015

Do you love mermaids?

0

As you may know, every year I do the artwork for an annual street theater festival in Belgium, called Zapparade. I love it, because I can really go wild with my ideas and I have total freedom.

This year’s Zapparade had Jules Vernes 20.000 Leagues Under The Sea for a theme. And while looking for images to use in my artwork, I found some great vintage mermaid images. I thought there weren’t that many good mermaid kits available and so I decided to make my own. That’s what inspired me to make this Mermaids Collection.

The Mermaids Collection was designed with luscious coral red and ocean green colour tones. It includes a lot of artsy elements as well. If you are looking for a kit to scrap your travel layouts, aquarium visits, underwater scenes or snorkeling photos, then this collection is the perfect fit.

And you can now get everything for a crazy price!

This is what you will get:

Mermaids Fantasy Papers - 9 backgrounds

Mermaids Solid Papers - 9 backgrounds

Mermaids Embellishments - 47 png images (3 brads, 3 branches, 3 buttons, 1 starfish, 1 wire, 3 ephemera pieces
1 paper flower, 1 fanfold, 2 frames, 1 slide frame, 2 blank tags, 1 blank wordstrips, 2 washi tape, 1 lace, 1 metal sequins, 7 artsy overlays/ornaments, 1 dots, 3 paint brushes, 2 splatters, 3 photomasks, 5 word art)

Mermaids Artsy Transfers - 5 X 2 png transfer images (two versions, with and without words)

Mermaids Journal Cards - 5 journal cards 3 x 4 in and 3 journal cards 4 x 6 in

Get this pack for an amazing price!

Here is some layout inspiration:

I belong to the ocean uses Mermaids Solid Papers and Embellishments

You are my little mermaid uses Mermaids Fantasy Papers and Embellishments

Remember, this offer expires on Monday, August 26th. Don’t miss it!

Have a wonderful weekend,

Anja
DATE 21 Aug 2015
BY AnjaDD

About last week…

0

Last week has been busy and lots of things have happened. My card designs have been activated at Kaartje2Go (and I’ve had sales already - yeah!), I created new designs for my Etsy store and I’ve finally registered for Design Star, a self-paced workshop with Traci Reed at Scrapaneers.

Kaartje2Go

Having my card designs at Kaartje2Go is great! I design, upload, and Kaartje2Go does all the rest: selling, printing, shipping… It took me some time though to adjust my existing designs to the new templates and sizes and I had to provide extra designs for the inside of the cards (people can choose to order a double folded or single card). But I think they look great in my gallery!

My cards are just in Dutch for now, but I’m thinking of offering an English version as well. Maybe not through Kaartje2Go though.

New designs for my Etsy store

I’ve been making some coordinating supplies to existing paperpacks in my Etsy store last week. Creating artsy transfers and word art to complement my Castles & Princesses Paperpack was so much fun, and I’ve also created some artsy transfers for my Mermaid Paperpack. I’ll be offering the transfers with and without the wordart.

They will be added to my store soon, watch out for my next newsletter! In the mean time, here’s a little sneak peek:

Design Star

As for Design Star, it was something I’ve been wanting to do for so long and I’m really happy I finally did. I’ve learnt heaps already. The workshop includes hours and hours of live recorded webinars, informative video-tutorials and PDF handouts. At the end of class, I’ll sit down with Traci virtually in a one-on-one session identifying my strengths and skills, an opportunity that I don’t want to miss. Although this workshop is aimed at scrapbook designers, I’ve learnt so many new things that will definitely improve my regular design work as well.

Enyoing the summer

I know that in many countries schools are starting again, or have started already. But for Belgian students school doesn’t start until September 1. My daughter is going to be 13 in October and she will start her second year in first grade then. My husband is a teacher, and so he’s home a lot as well. We enjoy the extra time that we have together, especially the weekends (my husband works weekends during the school year). I love having them both at home, but at the same time I’m finding it harder to focus on my design work. So I’m also looking forward to having more routine in my daily activities 🙂

On Saturday we had an amazing trip to Pairi Daiza, an animal park. But it’s much more than that. As the ancient Persian name ‘Pairi Daiza’ (‘Enclosed Garden’) would suggest, it really is a paradise! The park flourishes on what were once the grounds of a Cistercian monastery, Cambron Abbey. 135 acres of garden, centuries-old trees, intriguing plants and exquisite flowers from all over the world, architectural treasures (all authentic!) created by artisans from China, Indonesia, Thailand… and finally, 5,000 animals that live and thrive there. Let me share some pictures I made:

The Andalusian Garden

The Karibuni restaurant at the Oasis, surrounded by exotic animals, bamboos, lianas, banana trees, hibiscus, waterfalls, giant turtles, otters, mongooses, hornbills and beos.

The Buddhist temple in the City of Immortals; everything here is authentic and was manufactured in China, by skilled artisans.

And yes, we got to see the giant pandas! To give Hao Hao and Xing Hui a home, Pairi Daiza built a Sichuan mountain, a bamboo forest and a cave with amethysts. The image quality is not so good, but we could only see them behind glass.

Amazing views everywhere you go…

An impressive cascade at the Flower Temple, dedicated to the universe of flowers, in accordance with the animistic principles in Balinese Hinduism that every form of life is of divine origin, worthy of a temple. The water, the cradle of all life, flows along its flank, accompanied by 2 small dragon snakes.

Authentic Thai house (even the columns are original, taken from a house destroyed in a fire).

And then an elephant passed by 🙂

Still impressed with this monumental staircase, even if it was our third visit in 10 years. In 1776 it inspired Jozef II, Emperor of Austria, to the following statement: “This staircase is perhaps one of the most beautiful in Europe, but I doubt if it leads to heaven”. Legend says that the monks took revenge by burning a portrait of the emperor at the foot of the tower. That only brought them misery and 13 years later the Emperor classified Cambron as a useless abbey. The French Revolution did the rest. Now the patrimony of the monks of Cambron is listed as national heritage.

Ah, the raptor show… Eagles, buzzards, falcons, vultures and condors fly over the arena from one falconer to another, right past our heads. With the impressive backdrop of church, nave and abbey towers, this is one of my favourite events at Pairi Daiza.

And finally… trying to make some great pictures of the fascinating jelly fish in The Nautilus. Not easy, because they are moving around constantly!

But I think this one is not so bad:

Okay, time for me to go. See you next time!

Anja

DATE 10 Aug 2015
BY AnjaDD

Using the Offset filter in Photoshop to create patterns

6

As I promised in last week’s post I wanted to share what I’ve learnt so far about making patterns in Photoshop. I am definitely not an expert and I still have much to learn, but these tricks might help you start out with your own basic patterns. Making patterns in Photoshop is fun and it’s quite addictive. But above all it’s very easy if you use the Offset filter (I use Photoshop CC2015 on a PC). The print screen images are clickable for larger view.

This is one of the patterns I made for ZENZIJN and Petra used it here .

You can make the most amazing patterns from simple ornamental elements. For this particular pattern I used an image from Vintage Printable, a site that is jam-packed with vintage public domain images:

In order to use the drawings for a pattern I needed to somehow extract them from the background. As you can see it is not that easy to cut this out in Photoshop, even with the pen tool. My trick? Turn the items into a brush, then save them as png files.

Bittbox has a tutorial on how to prepare images to create sharp and clean Photoshop brushes. It’s from 2007, but it’s still working perfectly. You can find it here. First I turned the image black and white, then I selected some of the elements that I wanted to use in the pattern (with the Lasso tool), then I followed the steps in the Bittbox tutorial. Once you have your brushes, you can save them as separate png files for use in a pattern. Simply open up a new Photoshop document, apply your brush and save as png.

I ended up with these two elements:

With these elements we are going to create a tile for our pattern. The tile will then be repeated in the final pattern.

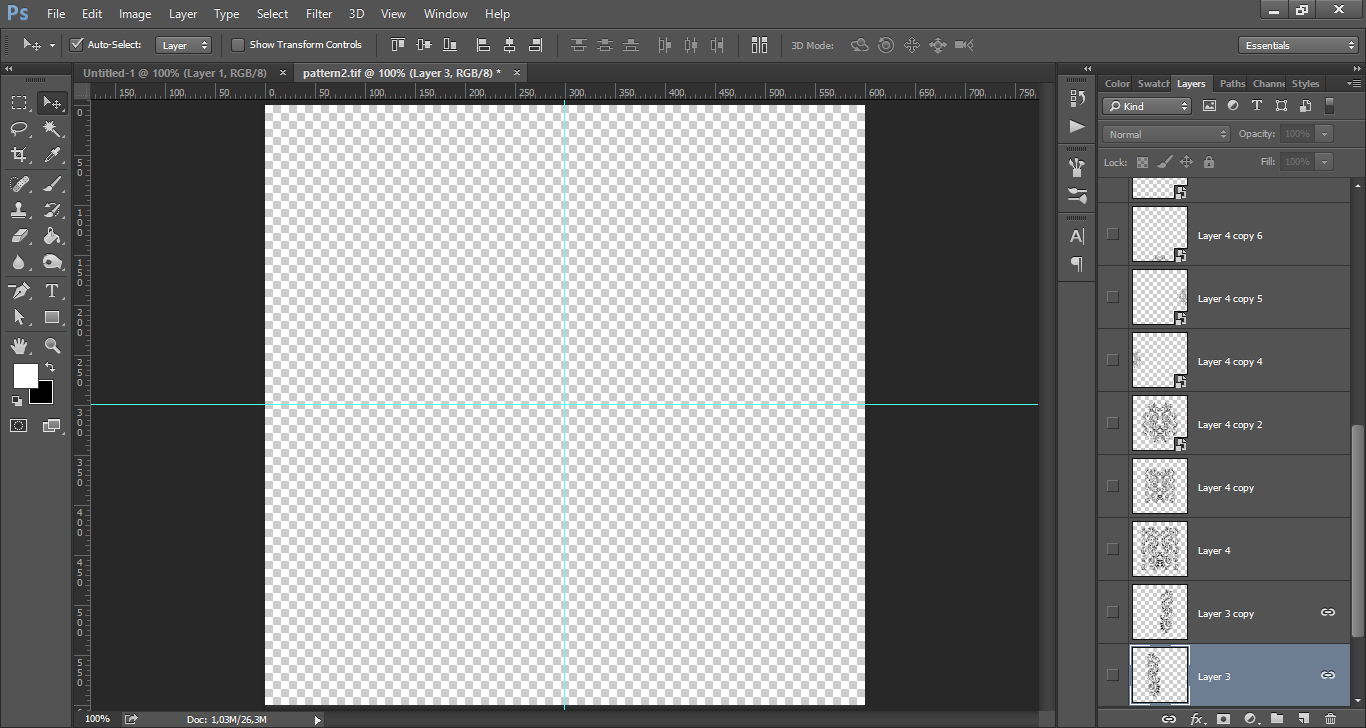
Create a new Photoshop document, size 600 x 600 px, at 300 dpi. If you are going to use the Offset filter it is important to choose dimensions that can easily be divided into 2, 3, 4, 5 and so on. You’ll understand why further in this tutorial.

Set guides at half the width and height to help you center the pattern. A very easy way to do so is to choose Window > New guide, then select Horizontal or Vertical and set the position at 50 %; Photoshop will automatically put the guides at 300 px horizontally and 300 px vertically. You could also have set the position at 300 px right away, in this case it was easy to calculate. But in other documents where you want a guide at half the width or height, it might not be that easy and then you can just add 50 % (or any other percentage that is needed).

afb3

Add the first element:

If you select the element with the Move tool, you will notice that it will ‘stick’ to the guides if you try to move it. Put it on the left side of the vertical guide, and in the center of the horizontal guide. Then bring in the second element:

This element will also come on the left, and centered in the middle. Select both elements and copy them to the right by choosing Edit > Transform > Flip Horizontal. Here is what we have so far:

This was my first version of the pattern tile, but the final result was not what I had in mind. Like many things, pattern making is all about trial and error. So we are going to change a few things.

Keep the two elements in the center, but erase part of the outer elements. I erased the top and bottom half moon image so I had three half moons instead of five half moons. Then I scaled the half moons up a bit, not too much though. And the elements in the middle were scaled down a bit. This is what I came up with, looks much better already:

To make things easier you can make a merged copy of the elements. Making a merged copy is very easy: simply press the Alt key, and while pressing it, go to Layer > Merge Visible (that’s for Windows). You will now have an image with the four elements united as one, and you will still be able to access the separate elements in the layers below if you would need to change something afterwards.

Here is where the fun comes in!

Make a copy of the merged image, because the Offset filter will leave an empty space at the selection’s original location. Then choose Filter > Other > Offset and the Offset dialog box will open up. This is why choosing easy dimensions was so important: enter half the width of the document into the Horizontal value box and half the height of the document into the Vertical value box. Since our document is 600 x 600 px, set both the Horizontal and Vertical options to 300 px. Make sure the Wrap Around option is selected at the bottom of the dialog box. And there you have it:

Looks great already, but I thought that the space between the elements was too empty. So I made another copy of the original merged copy and scaled it down to about 50%, it had to fit in the empty spaces. We can use the Offset filter again, but with other values than before. For better viewing, make the layer with the original image in the middle invisible:

Make a copy of the tile and choose Filter > Other > Offset to open up the Offset filter dialog box. We will now have to make some calculations. If you fill in the same values as before, the tile will go in the corners again. That is not what we want. We will need to make this pattern in two steps. First we will determine the horizontal position, then we will determine the vertical position. By adding ‘0’ pixels for the horizontal position, and ‘300’ pixels for the vertical position, the tile will be moved to the top and bottom in the middle of the document.

Make a new copy of the original tile, then go back to Filter > Other > Offset, and change the settings. Fill in ‘300’ pixels for the horizontal position and ‘0’ pixels for the vertical position. The tile will be placed on the left and the right side of your document. Make the original tile in the center invisible, we do not need it anymore. Turn the layer with the larger version of the tile back on and we finally have the whole pattern. This is what it looks like, pretty cool, isn’t it?

Choose Edit > Define Pattern. Your tile has now been saved as a Photoshop pattern and you can use it over and over again.

The easiest way to use patterns is to choose the layer style ‘Pattern overlay’. Open up a new document - let’s say 3600 x 3600 px - and fill it with white or any other colour you like. You can always change it later.

Double click on Layer 1, that will open up the Layer Style dialog box and select ‘Pattern Overlay’. Then from the dropdown box, select your pattern. The reason why it is better to choose ‘Pattern Overlay’, is that you can scale your pattern very easily. Simply drag the scaler down if you want it smaller. I kept my pattern at 100%. Click OK when you’re satisfied with how it looks.

To have full control over your pattern, you need to make it into a separate layer. Right-click on the Layers effect, then choose ‘Create layer’ from the dropdown menu. This will turn your pattern overlay into a clipping mask.

Two more steps to take: you need to release the clipping mask and convert the layer into a Smart Object. Right-click on the pattern layer and choose ‘Release clipping mask’.

Next, right-click on the layer again and choose ‘Convert to Smart Object’:

And we’re there, the pattern is now fully editable. Add colour, layer styles, experiment. Have fun!

DATE 03 Aug 2015
BY AnjaDD

Sign up for my newsletter and receive a bunch of freebies.

CREATIVE TEAM

  • Alanna Chandler
  • Andrea Young
  • Anja De Dobbelaere (that’s me!)
  • Carina Kindh
  • Carmel Munro
  • Diane Howard
  • Géraldine Touitou
  • Heidi McGregor
  • Kerstin Rynek
  • Lisa Frisch
  • Liz Caranci
  • Lynne Morgado
  • Sylvia Regina
  • Sheila May

Search this blog

I’ve been published!

Categories

  • $1 Flash Sale (9)
  • Alice In Wonderland (9)
  • Alpha (1)
  • Art Journaling (17)
  • ATC (2)
  • Autumn (10)
  • Autumn (6)
  • Black Friday (2)
  • Blog (339)
  • Books (5)
  • Bundle (8)
  • Christmas (15)
  • Christmas in July (5)
  • Collab (2)
  • Commercial Use (46)
  • Creative Team Call (2)
  • Digiscrapparade (6)
  • Digital Art (7)
  • Digital kits (10)
  • Digital Scrapbooking (24)
  • Digital Scrapbooking Day (4)
  • DIY (12)
  • Dog Days Of Summer Sale (1)
  • Easter (9)
  • Element packs (12)
  • Etsy (19)
  • Facebook fangroup (1)
  • Fall (6)
  • Father's Day (8)
  • Featured Designer (1)
  • Frames (1)
  • Freebie (7)
  • Garden (6)
  • Grab Bag Gala (1)
  • Graphic Design (14)
  • Greeting Cards & Postcards (8)
  • Halloween (11)
  • Holidays (36)
  • Hybrid projects and printables (50)
  • I got published! (3)
  • iNSD (7)
  • Journal Cards (6)
  • Junk Journals (19)
  • Labor Day (2)
  • Layout inspiration (39)
  • Limited Commercial Licenses (1)
  • Mini O (6)
  • Miscellaneous (8)
  • Mother's Day (4)
  • Nature (6)
  • New Year (1)
  • New Year's Eve (1)
  • NSD Events (9)
  • Oldies But Goodies (7)
  • Oscraps (12)
  • Outdoors (7)
  • Paint (5)
  • Paperpack (28)
  • Party decorations (17)
  • Party printables (19)
  • Personal Use (4)
  • Photo Masks (4)
  • Photoshop (13)
  • Photoshop Artistry (1)
  • Photoshop brushes (8)
  • Photoshop Elements (3)
  • Pinterest (2)
  • Print (6)
  • Printable Home Decor (5)
  • Printable Tags (5)
  • Printables (9)
  • Saint-Patricks Day (4)
  • Sale (68)
  • Scrapgirls (3)
  • Seasonal (12)
  • Sinterklaas (1)
  • Somerset Digital Studio (2)
  • Spring (4)
  • Spring (10)
  • Steampunk (5)
  • Stitches (2)
  • Summer (5)
  • Summer (6)
  • Tea (3)
  • Templates (10)
  • Thanksgiving (6)
  • The Daily Digi (1)
  • The Graphics Fairy (22)
  • Transfers and overlays (7)
  • Travel (5)
  • Tutorial (24)
  • Valentine's Day (13)
  • Video (6)
  • Washi Tape (4)
  • Whimsical Challenge (7)
  • Winter (6)
  • Word Art (5)
  • Zapparade (5)

Archives

  • February 2020 (4)
  • December 2019 (1)
  • November 2019 (1)
  • October 2019 (4)
  • September 2019 (2)
  • August 2019 (4)
  • July 2019 (2)
  • June 2019 (2)
  • May 2019 (3)
  • April 2019 (2)
  • March 2019 (4)
  • January 2019 (1)
  • December 2018 (4)
  • November 2018 (1)
  • October 2018 (3)
  • August 2018 (1)
  • July 2018 (8)
  • June 2018 (9)
  • May 2018 (8)
  • April 2018 (3)
  • March 2018 (5)
  • February 2018 (5)
  • January 2018 (5)
  • December 2017 (3)
  • November 2017 (8)
  • October 2017 (6)
  • September 2017 (5)
  • August 2017 (11)
  • July 2017 (9)
  • June 2017 (11)
  • May 2017 (12)
  • April 2017 (9)
  • March 2017 (10)
  • February 2017 (9)
  • January 2017 (11)
  • December 2016 (8)
  • November 2016 (17)
  • October 2016 (7)
  • September 2016 (9)
  • August 2016 (10)
  • July 2016 (10)
  • June 2016 (9)
  • May 2016 (14)
  • April 2016 (12)
  • March 2016 (9)
  • February 2016 (9)
  • January 2016 (1)
  • December 2015 (2)
  • September 2015 (1)
  • August 2015 (3)
  • July 2015 (5)
  • June 2015 (8)
  • May 2015 (6)
  • April 2015 (5)
  • March 2015 (8)
  • February 2015 (2)
COPYRIGHT 2015 ANJA DE DOBBELAERE