facebook
flickr
linkedin
twitter
email
pinterest
  • HOME
  • ABOUT ME
  • SUBSCRIBE
  • BLOG
  • MY SHOPS
    • Etsy - Personal Use
    • Etsy - Commercial Use
    • Oscraps - Personal Use
    • Oscraps - Commercial Use
  • TOU
  • PRIVACY POLICY
  • WHAT PEOPLE SAY

Photoshop

Using the Offset filter in Photoshop to create patterns

6

As I promised in last week’s post I wanted to share what I’ve learnt so far about making patterns in Photoshop. I am definitely not an expert and I still have much to learn, but these tricks might help you start out with your own basic patterns. Making patterns in Photoshop is fun and it’s quite addictive. But above all it’s very easy if you use the Offset filter (I use Photoshop CC2015 on a PC). The print screen images are clickable for larger view.

This is one of the patterns I made for ZENZIJN and Petra used it here .

You can make the most amazing patterns from simple ornamental elements. For this particular pattern I used an image from Vintage Printable, a site that is jam-packed with vintage public domain images:

In order to use the drawings for a pattern I needed to somehow extract them from the background. As you can see it is not that easy to cut this out in Photoshop, even with the pen tool. My trick? Turn the items into a brush, then save them as png files.

Bittbox has a tutorial on how to prepare images to create sharp and clean Photoshop brushes. It’s from 2007, but it’s still working perfectly. You can find it here. First I turned the image black and white, then I selected some of the elements that I wanted to use in the pattern (with the Lasso tool), then I followed the steps in the Bittbox tutorial. Once you have your brushes, you can save them as separate png files for use in a pattern. Simply open up a new Photoshop document, apply your brush and save as png.

I ended up with these two elements:

With these elements we are going to create a tile for our pattern. The tile will then be repeated in the final pattern.

Create a new Photoshop document, size 600 x 600 px, at 300 dpi. If you are going to use the Offset filter it is important to choose dimensions that can easily be divided into 2, 3, 4, 5 and so on. You’ll understand why further in this tutorial.

Set guides at half the width and height to help you center the pattern. A very easy way to do so is to choose Window > New guide, then select Horizontal or Vertical and set the position at 50 %; Photoshop will automatically put the guides at 300 px horizontally and 300 px vertically. You could also have set the position at 300 px right away, in this case it was easy to calculate. But in other documents where you want a guide at half the width or height, it might not be that easy and then you can just add 50 % (or any other percentage that is needed).
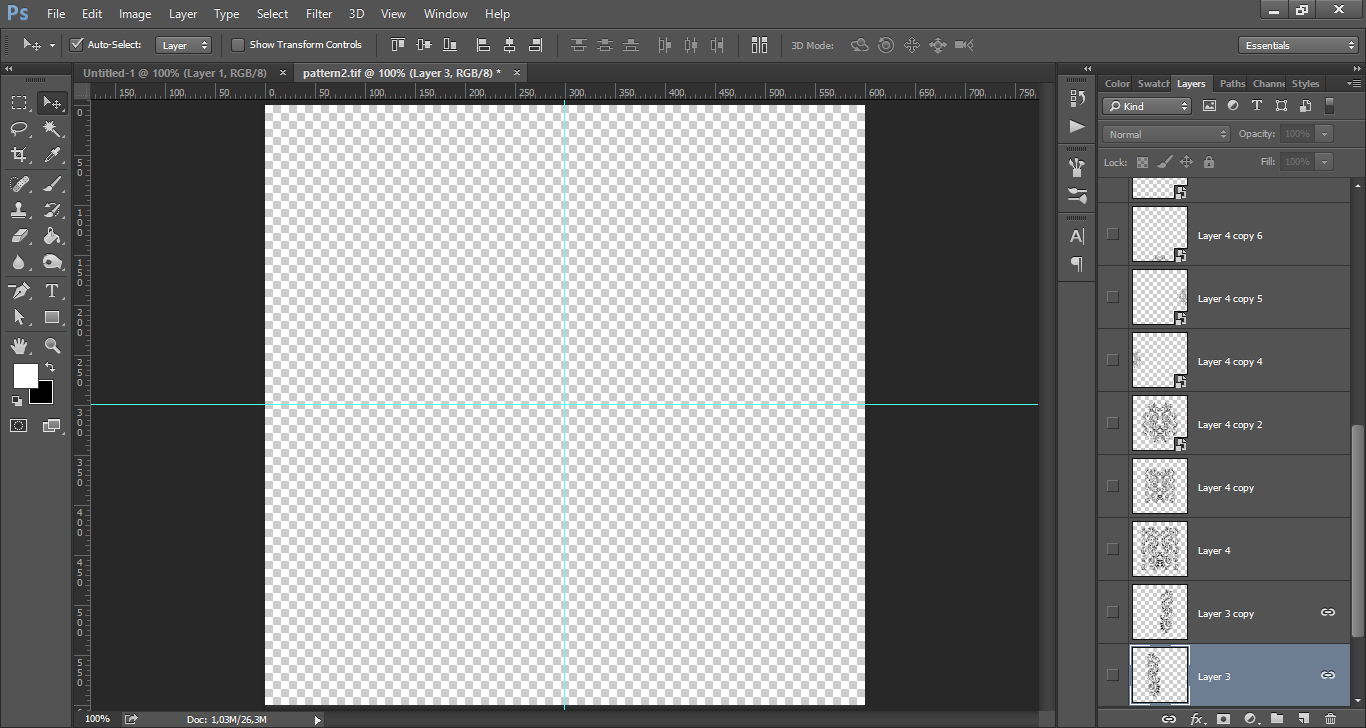
afb3

Add the first element:

If you select the element with the Move tool, you will notice that it will ‘stick’ to the guides if you try to move it. Put it on the left side of the vertical guide, and in the center of the horizontal guide. Then bring in the second element:

This element will also come on the left, and centered in the middle. Select both elements and copy them to the right by choosing Edit > Transform > Flip Horizontal. Here is what we have so far:

This was my first version of the pattern tile, but the final result was not what I had in mind. Like many things, pattern making is all about trial and error. So we are going to change a few things.

Keep the two elements in the center, but erase part of the outer elements. I erased the top and bottom half moon image so I had three half moons instead of five half moons. Then I scaled the half moons up a bit, not too much though. And the elements in the middle were scaled down a bit. This is what I came up with, looks much better already:

To make things easier you can make a merged copy of the elements. Making a merged copy is very easy: simply press the Alt key, and while pressing it, go to Layer > Merge Visible (that’s for Windows). You will now have an image with the four elements united as one, and you will still be able to access the separate elements in the layers below if you would need to change something afterwards.

Here is where the fun comes in!

Make a copy of the merged image, because the Offset filter will leave an empty space at the selection’s original location. Then choose Filter > Other > Offset and the Offset dialog box will open up. This is why choosing easy dimensions was so important: enter half the width of the document into the Horizontal value box and half the height of the document into the Vertical value box. Since our document is 600 x 600 px, set both the Horizontal and Vertical options to 300 px. Make sure the Wrap Around option is selected at the bottom of the dialog box. And there you have it:

Looks great already, but I thought that the space between the elements was too empty. So I made another copy of the original merged copy and scaled it down to about 50%, it had to fit in the empty spaces. We can use the Offset filter again, but with other values than before. For better viewing, make the layer with the original image in the middle invisible:

Make a copy of the tile and choose Filter > Other > Offset to open up the Offset filter dialog box. We will now have to make some calculations. If you fill in the same values as before, the tile will go in the corners again. That is not what we want. We will need to make this pattern in two steps. First we will determine the horizontal position, then we will determine the vertical position. By adding ‘0’ pixels for the horizontal position, and ‘300’ pixels for the vertical position, the tile will be moved to the top and bottom in the middle of the document.

Make a new copy of the original tile, then go back to Filter > Other > Offset, and change the settings. Fill in ‘300’ pixels for the horizontal position and ‘0’ pixels for the vertical position. The tile will be placed on the left and the right side of your document. Make the original tile in the center invisible, we do not need it anymore. Turn the layer with the larger version of the tile back on and we finally have the whole pattern. This is what it looks like, pretty cool, isn’t it?

Choose Edit > Define Pattern. Your tile has now been saved as a Photoshop pattern and you can use it over and over again.

The easiest way to use patterns is to choose the layer style ‘Pattern overlay’. Open up a new document - let’s say 3600 x 3600 px - and fill it with white or any other colour you like. You can always change it later.

Double click on Layer 1, that will open up the Layer Style dialog box and select ‘Pattern Overlay’. Then from the dropdown box, select your pattern. The reason why it is better to choose ‘Pattern Overlay’, is that you can scale your pattern very easily. Simply drag the scaler down if you want it smaller. I kept my pattern at 100%. Click OK when you’re satisfied with how it looks.

To have full control over your pattern, you need to make it into a separate layer. Right-click on the Layers effect, then choose ‘Create layer’ from the dropdown menu. This will turn your pattern overlay into a clipping mask.

Two more steps to take: you need to release the clipping mask and convert the layer into a Smart Object. Right-click on the pattern layer and choose ‘Release clipping mask’.

Next, right-click on the layer again and choose ‘Convert to Smart Object’:

And we’re there, the pattern is now fully editable. Add colour, layer styles, experiment. Have fun!

DATE 03 Aug 2015
BY AnjaDD

More tropical things :-)

0

I’m making some transfers/overlays that coordinate with my Vintage Tropical Paperpack (sorry, cannot help making things with that theme)! This is the first one (I intend to make 5 different designs)! They will come in a pack with brushes (ABR and PNG files) in my Etsy store.


Have a wonderful day!

DATE 10 Jun 2015
BY AnjaDD

For real is always better

0

Check this out! The banner I designed for this year’s Zapparade, and an older design that I made two years ago (the banner with the girl and the violin). Always exciting to see it printed!

I remember when I made the girl with the violin banner… I was asked to design a banner that would represent the ‘spirit’ of Zapparade… Not an easy thing to do. Although I very well knew what Zapparade felt like to me, it was really hard to put an image on it. I remember multiple sleepless nights as the deadline came nearer. Then, one Friday night, I got up at 1 o’clock in the morning (I couldn’t sleep anyway), because I had a head full of ideas for that banner. And yes, that night, the design for the ‘Spirit of Zapparade’ was born LOL. That night I went back to bed at around 5 in the morning, tired, but very happy. I finished the banner the next day 🙂


DATE 09 Jun 2015
BY AnjaDD

Zapparade 2015 program

0

I’m working on the Zapparade program today! It’s a 20 pages A5 booklet that will guide you through the afternoon and evening. And this is the last of the artwork for this year’s Zapparade event. I’m always happy when everything comes together.

A little sneak peek!

Have a nice day!

DATE 08 Jun 2015
BY AnjaDD

Zapparade 2015 flyer

0

The flyer for the upcoming Zapparade 2015 is ready! Next week flyer & poster will go to the printing company. Always exciting to see how it turns out in print 🙂

DATE 17 May 2015
BY AnjaDD
TAG flyer, Zapparade

Canvas beauties

0

I got another package today! I had three of my collages printed on canvas and I’m so happy with the result. These will be for sale in Maison Saints&Bullies in Oostende! Is Oostende too far for you? Send me an e-mail [email protected] and I’ll get back to you with more details.

DATE 15 May 2015
BY AnjaDD
TAG collage, Digital Art, retro, vintage

Finished!

0

And while the Zapparade-team is working hard behind the scenes, I finished the design for the poster. I’m quite happy with how it all turned out. Have a look!

DATE 10 May 2015
BY AnjaDD
TAG collage, Digital Art, Photoshop, vintage, Zapparade

more sneak peeks

0

I finished another card design today (well, almost finished). I now have 6 different greeting card designs… It is my goal to have around 10 different designs by the end of next week, because I have to have them printed by the end of May. More details soon!

Meanwhile, are you ready for a few more sneak peeks?

DATE 27 Apr 2015
BY AnjaDD
TAG Greeting cards, Photoshop, Postcards, WIP

Extracting in Photoshop

0

Extracting images in Photoshop can be time consuming and quite boring, especially with many small parts to cut out. But with some relaxing music it’s not so bad, almost meditative.

My favourite tool for extracting images is the Pen tool. It allows you to make very smooth and neat curves. It’s not easy to master the Pen tool (it took me a lot of effort). But once you know how it works, it’s amazing, you can cut out almost anything with it.

DATE 22 Apr 2015
BY AnjaDD
TAG Greeting cards, Photoshop, Postcards, retro, vintage, WIP

Cake & Cherry

0

I’m working on a set of greeting cards that I’ll be selling in a shop and I’m having so much fun. I’ve also been experimenting with patterns in Photoshop and I think I’m getting better at it! What do you think about this cake & cherry pattern?

DATE 01 Apr 2015
BY AnjaDD
TAG Greeting cards, Photoshop, Photoshop patterns, Postcards, retro, vintage, WIP

3D images tutorial

0

If you don’t know Chris Spooner yet, then you definitely have to visit his blog. He has the most amazing tutorials, for both Photoshop ànd Illustrator. And not just that. He has some cool freebies on his blog and he has his own collection of textures, brushes, vectors and more if you become a Premium member.

Here’s his tutorial on creating 3D images. I really want to try this one out!


Have fun!

DATE 09 Mar 2015
BY AnjaDD
TAG Photoshop, tutorial

Magic

0

One of my (many!) hobbies is digital scrapbooking. Digital scrapbooking is is simply creating a scrapbook layout on the computer with papers and elements that are created digitally using graphic design software. I discovered digital scrapbooking in 2011 and I’m hooked ever since! For me it’s the perfect way of keeping memories and making beautiful books with my pictures. Very time consuming, yes, definitely. But I just love it.

Digital art journaling is a form of digital scrapbooking; you combine art and words to express yourself. It’s not complex, and there really aren’t any rules for art journaling. It’s all about self-expression.

I have a fanpage where I keep all my scrapbooking & art journaling layouts. If you’re interested, you can find it here.

This is an art journaling page I made, I wanted to share it because I love the quote so much, it is so applicable to my current situation!


Made with Angie Young Designs ‘Building The New‘ collection (available at Scrapbookgraphics).

DATE 06 Mar 2015
BY AnjaDD
TAG art journaling, Photoshop, scrapbooking, vintage

Zapparade 2015

0

It all seems very quiet on the Zapparade front, but the team is working hard on the next edition! Here’s a little sneak peek from what I’m currently working on!

DATE 01 Mar 2015
BY AnjaDD

Sign up for my newsletter and receive a bunch of freebies.

CREATIVE TEAM

  • Alanna Chandler
  • Andrea Young
  • Anja De Dobbelaere (that’s me!)
  • Carina Kindh
  • Carmel Munro
  • Diane Howard
  • Géraldine Touitou
  • Heidi McGregor
  • Kerstin Rynek
  • Lisa Frisch
  • Liz Caranci
  • Lynne Morgado
  • Sylvia Regina
  • Sheila May

Search this blog

I’ve been published!

Categories

  • $1 Flash Sale (9)
  • Alice In Wonderland (9)
  • Alpha (1)
  • Art Journaling (17)
  • ATC (2)
  • Autumn (10)
  • Autumn (6)
  • Black Friday (2)
  • Blog (339)
  • Books (5)
  • Bundle (8)
  • Christmas (15)
  • Christmas in July (5)
  • Collab (2)
  • Commercial Use (46)
  • Creative Team Call (2)
  • Digiscrapparade (6)
  • Digital Art (7)
  • Digital kits (10)
  • Digital Scrapbooking (24)
  • Digital Scrapbooking Day (4)
  • DIY (12)
  • Dog Days Of Summer Sale (1)
  • Easter (9)
  • Element packs (12)
  • Etsy (19)
  • Facebook fangroup (1)
  • Fall (6)
  • Father's Day (8)
  • Featured Designer (1)
  • Frames (1)
  • Freebie (7)
  • Garden (6)
  • Grab Bag Gala (1)
  • Graphic Design (14)
  • Greeting Cards & Postcards (8)
  • Halloween (11)
  • Holidays (36)
  • Hybrid projects and printables (50)
  • I got published! (3)
  • iNSD (7)
  • Journal Cards (6)
  • Junk Journals (19)
  • Labor Day (2)
  • Layout inspiration (39)
  • Limited Commercial Licenses (1)
  • Mini O (6)
  • Miscellaneous (8)
  • Mother's Day (4)
  • Nature (6)
  • New Year (1)
  • New Year's Eve (1)
  • NSD Events (9)
  • Oldies But Goodies (7)
  • Oscraps (12)
  • Outdoors (7)
  • Paint (5)
  • Paperpack (28)
  • Party decorations (17)
  • Party printables (19)
  • Personal Use (4)
  • Photo Masks (4)
  • Photoshop (13)
  • Photoshop Artistry (1)
  • Photoshop brushes (8)
  • Photoshop Elements (3)
  • Pinterest (2)
  • Print (6)
  • Printable Home Decor (5)
  • Printable Tags (5)
  • Printables (9)
  • Saint-Patricks Day (4)
  • Sale (68)
  • Scrapgirls (3)
  • Seasonal (12)
  • Sinterklaas (1)
  • Somerset Digital Studio (2)
  • Spring (4)
  • Spring (10)
  • Steampunk (5)
  • Stitches (2)
  • Summer (5)
  • Summer (6)
  • Tea (3)
  • Templates (10)
  • Thanksgiving (6)
  • The Daily Digi (1)
  • The Graphics Fairy (22)
  • Transfers and overlays (7)
  • Travel (5)
  • Tutorial (24)
  • Valentine's Day (13)
  • Video (6)
  • Washi Tape (4)
  • Whimsical Challenge (7)
  • Winter (6)
  • Word Art (5)
  • Zapparade (5)

Archives

  • February 2020 (4)
  • December 2019 (1)
  • November 2019 (1)
  • October 2019 (4)
  • September 2019 (2)
  • August 2019 (4)
  • July 2019 (2)
  • June 2019 (2)
  • May 2019 (3)
  • April 2019 (2)
  • March 2019 (4)
  • January 2019 (1)
  • December 2018 (4)
  • November 2018 (1)
  • October 2018 (3)
  • August 2018 (1)
  • July 2018 (8)
  • June 2018 (9)
  • May 2018 (8)
  • April 2018 (3)
  • March 2018 (5)
  • February 2018 (5)
  • January 2018 (5)
  • December 2017 (3)
  • November 2017 (8)
  • October 2017 (6)
  • September 2017 (5)
  • August 2017 (11)
  • July 2017 (9)
  • June 2017 (11)
  • May 2017 (12)
  • April 2017 (9)
  • March 2017 (10)
  • February 2017 (9)
  • January 2017 (11)
  • December 2016 (8)
  • November 2016 (17)
  • October 2016 (7)
  • September 2016 (9)
  • August 2016 (10)
  • July 2016 (10)
  • June 2016 (9)
  • May 2016 (14)
  • April 2016 (12)
  • March 2016 (9)
  • February 2016 (9)
  • January 2016 (1)
  • December 2015 (2)
  • September 2015 (1)
  • August 2015 (3)
  • July 2015 (5)
  • June 2015 (8)
  • May 2015 (6)
  • April 2015 (5)
  • March 2015 (8)
  • February 2015 (2)
COPYRIGHT 2015 ANJA DE DOBBELAERE